Showing posts with label frugal. Show all posts

Sunday, December 15, 2013

Easiest Holiday Fudge

Easiest Holiday Fudge 


You need:

1 1/2 c semi sweet chocolate chips
1 1/2 c milk chocolate chips
1 can (14 oz.) sweetened condensed milk (not evaporated)
1 1/2 c chopped walnuts
2 tsp vanilla

 Line a 8 inch square pan with wax paper, or foil.  In a double boiler, melt chocolate chips, add milk and stir constantly until incorporated. Remove from heat.  Stir in vanilla and walnuts. While still hot, pour immediately into lined pan.  Place into refrigerator for at least 2 hours to completely cool and set recipe. You might have to go longer.  When firm, remove from wax paper or foil, and cut into 8 rows by 8 rows for 1" pieces.

Variations to this recipe can be any 1 1/2 c chopped nuts you prefer (ex: almonds, pistachios, hazelnuts, or cashews). Or you can make this very festive by using crushing up candy canes instead of nuts.


I have found this recipe, if I watch sales and use coupons during holiday season, is very cheap and easy to make! Chocolate chips are frequently on sale! This makes  this fudge, for me, a perfect addition to holiday gift plates! It actually is Frugal, in that the recipe is so inexpensive, and the candy so rich, it goes a long way- it makes for a fantastic gift without high cost! Allowing me to share the season without a huge cut in my budget. :)

Thursday, December 12, 2013

Best Homemade Pizza Dough

Best Homemade Pizza Dough

(Dough for 2 reg. pizzas, or 4 mini personal pizzas)

 This particular recipe is delicious! For our family, the recipe has brought fun and joy into family food nights- everyone can participate. I usually have all the ingredients already on the shelf, and we save so much money! This feeds everyone with some left over for lunch next day (or midnight gamer's snacks), and the best part is each person gets to choose what goes on- fitting the moods, lightening hearts,  and bringing the family together for more than just a sit at the table- this gives us time. I hope it brings smiles to your family as well!

Homemade Pizza Dough

Start with large bowl & add:
3 tsp yeast
1 tsp sugar
1 1/3 c warm water

dissolve yeast and sugar in warm water in large bowl and allow to proof for 5 minutes. (will foam up)

add to yeast mixture:
3 tbsp olive oil
3 tbsp corn meal
1 tsp real salt
3 c all purpose flour or whole wheat flour

mix all together and knead dough until smooth. roll into ball, lightly oil the outside with olive oil and allow to rise until double- about 45 minutes


I always use the same bowl I just mixed it in- cuts down on dishes, but doesn't make for pretty pictures! Haha! Once doubled, you are ready to make pizzas! Yay! 

Cut dough in half **- this dough makes 2 pizzas. Roll out each half on lightly floured surface to desired size and thickness. Thin crust, thick crust- it all depends on what you roll it to! We like ours thin to regular.  Place on pizza pan, warmed pizza stone, or cookie sheet lightly dusted with cornmeal.  Bake in oven for 7 minutes at 450 F degrees. Remove from oven, Top with sauce, toppings of your choice an cheese. return to oven - Bake at 450F degrees for 9-10 minutes. (Sorry Sorry! I forgot to take a picture of rolling it out! I'll add it next time!) Here they are at prebake.


Have fun with the toppings! Have the kids help grate the cheese, and choose their own toppings. (For cheese lovers, you can roll pieces of string cheese into the crust edges and create a stuffed crust the kid's will love! -Do this at the first stage). Kids love rolling out the dough.** This is enough dough, you can further divide dough for four mini pizzas if everyone wants their own personal mini pizza!  Enjoy!


you might like the recipes and ideas on:
Frugal Days Sustainable Ways #100

Make Your Own Monday 12/16


you might enjoy:


Disclaimer: Affiliate Links in no way affect your end price, there is no increase for you. But, they do help to support the cost of the blog. Thank you.


Friday, December 6, 2013

My DIY Favorite! My Mix Laundry Soap

DIY Favorite! My Mix Laundry Soap!


We all have our favorites- the ONE recipe or household tip that started the ball rolling for DIY enthusiasts!

This laundry mix was mine- the starter of it all!

 I always had trouble with Laundry soaps. Tide is a hives producer, for me, personally. I always fought the laundry soap blues between budget and quality constraints. When my youngest started getting the itchies from other brand soaps I used, my options kept getting narrowed down. When the options I did have just didn't clean, or seemed watered down, or left bad smells (like some hypo allergenic unscented soaps can)...

...well,  I got fed up! Grrrrrr!

And the search was on.  Thus began my love for DIY!

And oh how my budget can love some of my discoveries.
Hence,  My project for the day!  My Mix!!!!!!! Yay!!!!! 
I'm always Always happy with the results of this one- it has never let me down! I absolutely love it!

I wrote about it before- at this link: My Mix Laundry Soap
So I won't be explaining everything over again, however- I'll give you the recipe once more- :DYay!


My Mix Laundry Soap

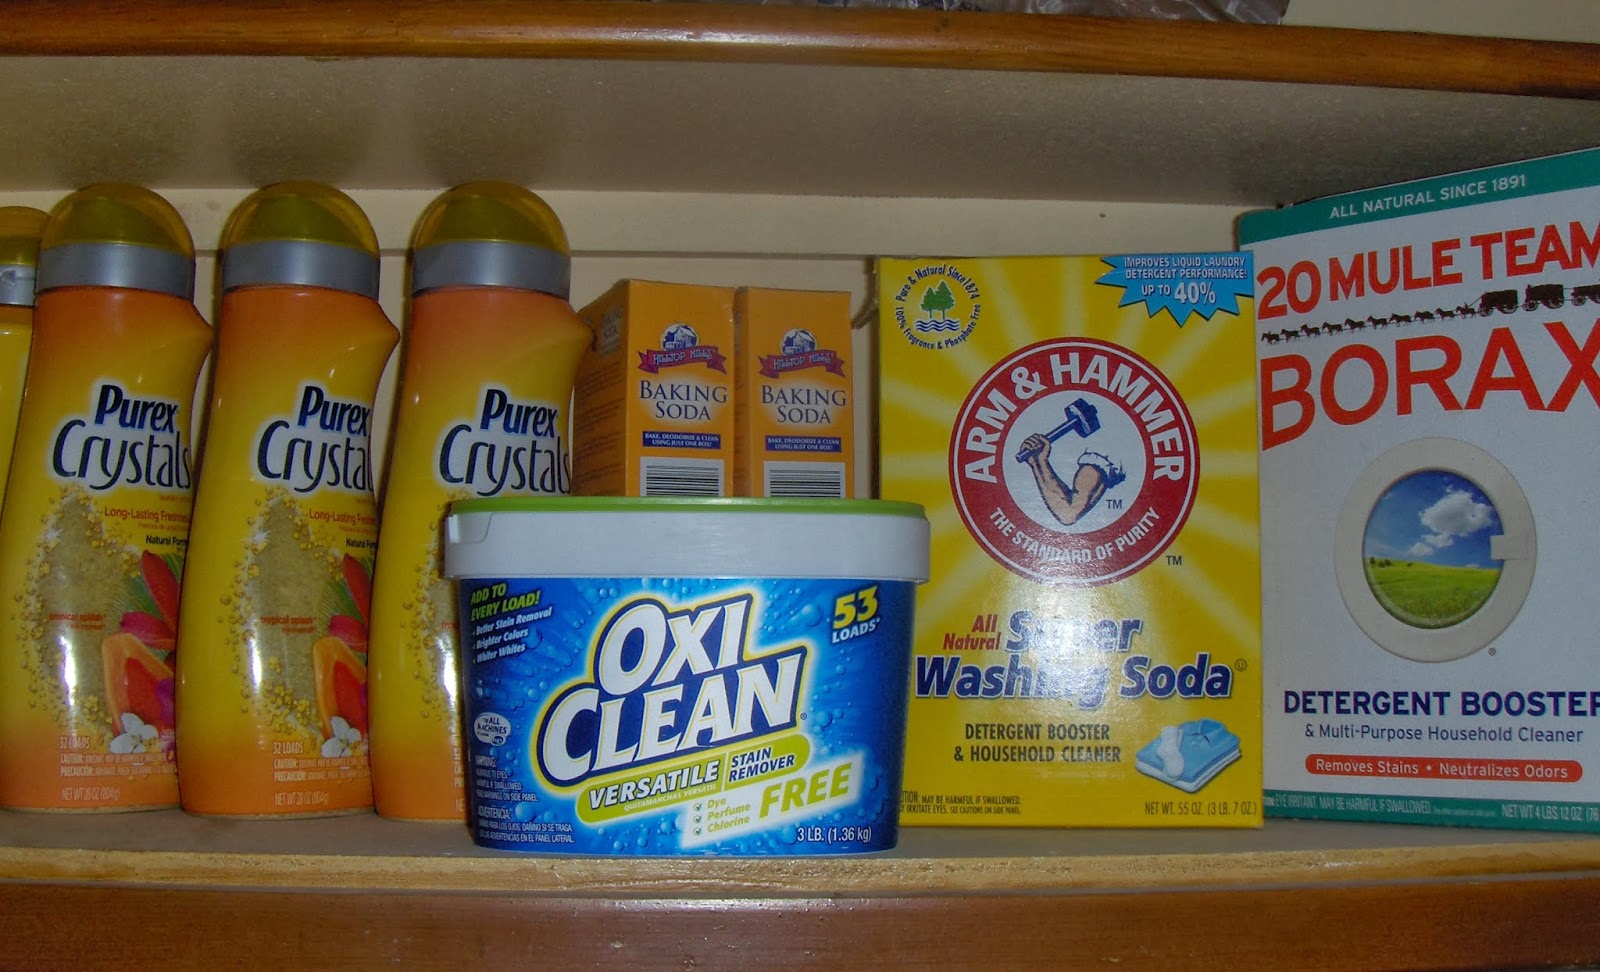
1 box 20 Mule Team Borax (4lb+)
1 box Arm & Hammer Super Washing Soda (3lb+)
4 boxes Baking soda (1lb ea)
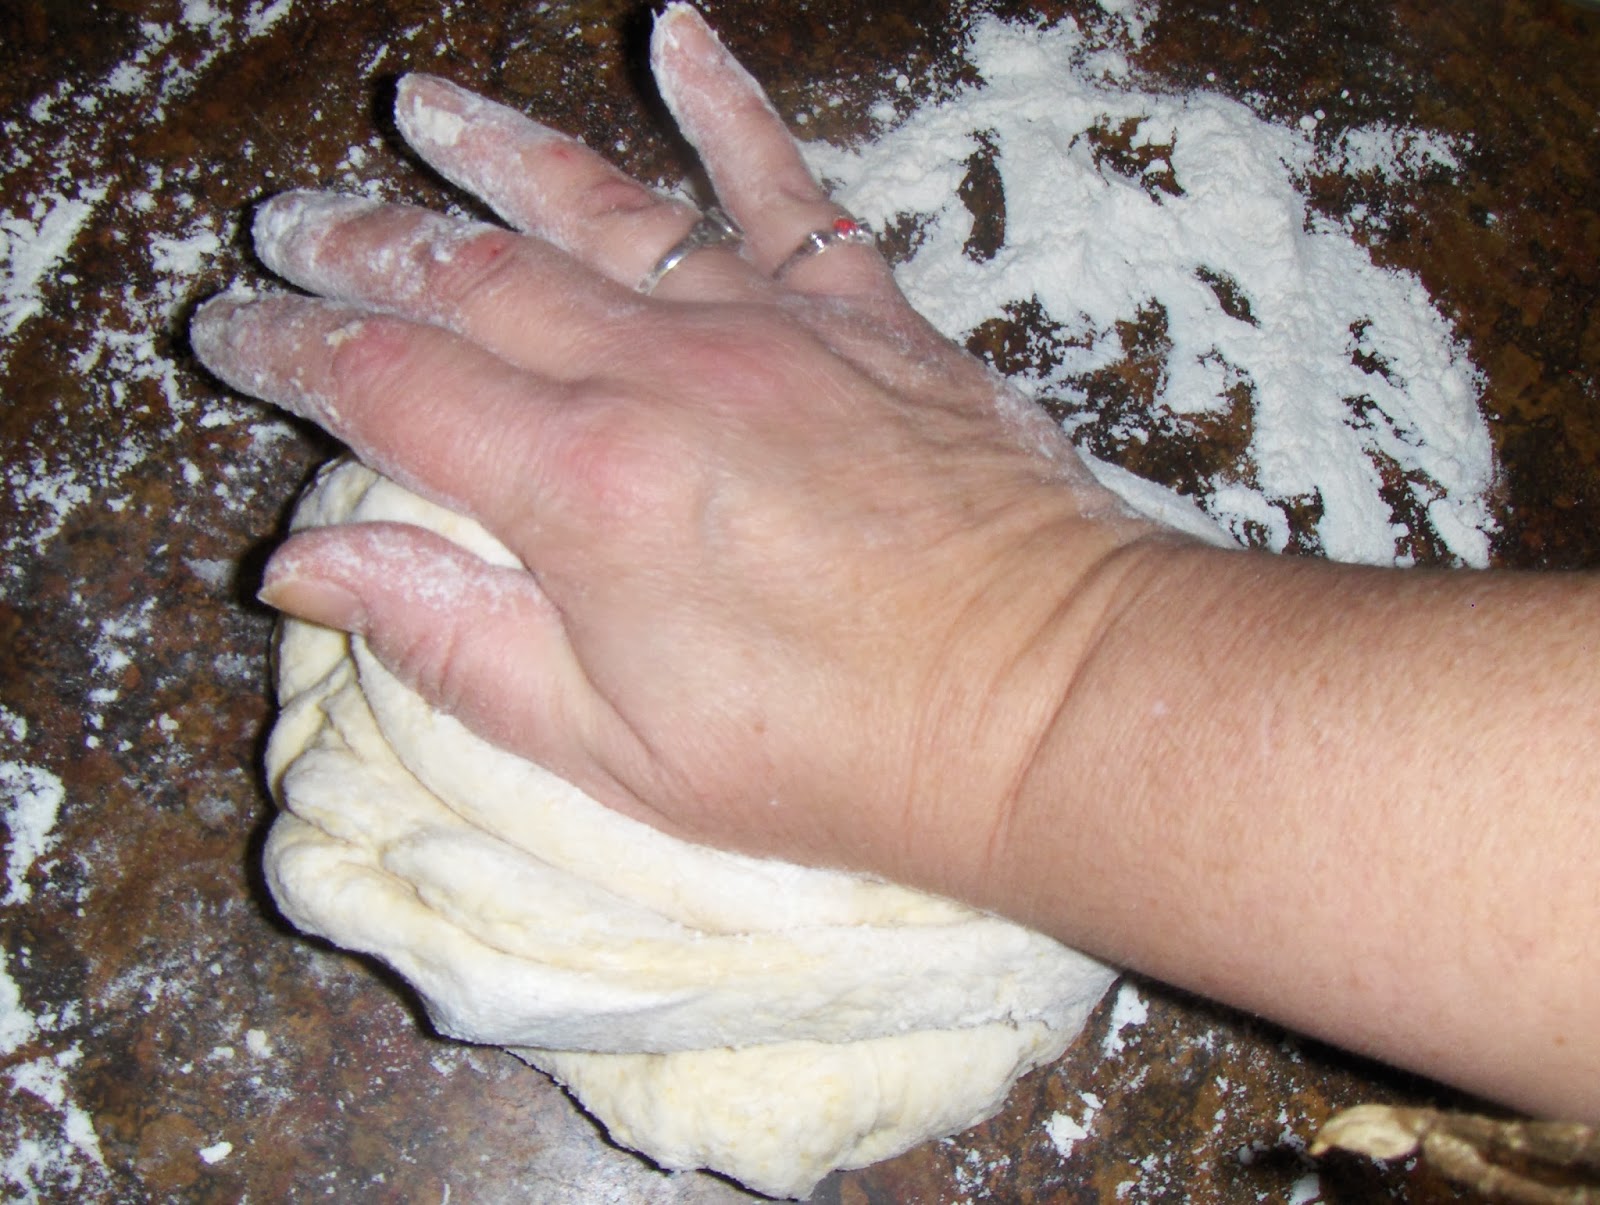
3 bars Zote soap (grated ahead of time)(14 0z ea)
3 Purex Crystals Laundry Enhancer (28 oz ea., or 2 -55 oz)
1 OxyClean  (3lb.)

step 1: grate the soap - like this:
(Note: A fine grate is best if you only use cold water. The Zote soap dissolves easily enough.)

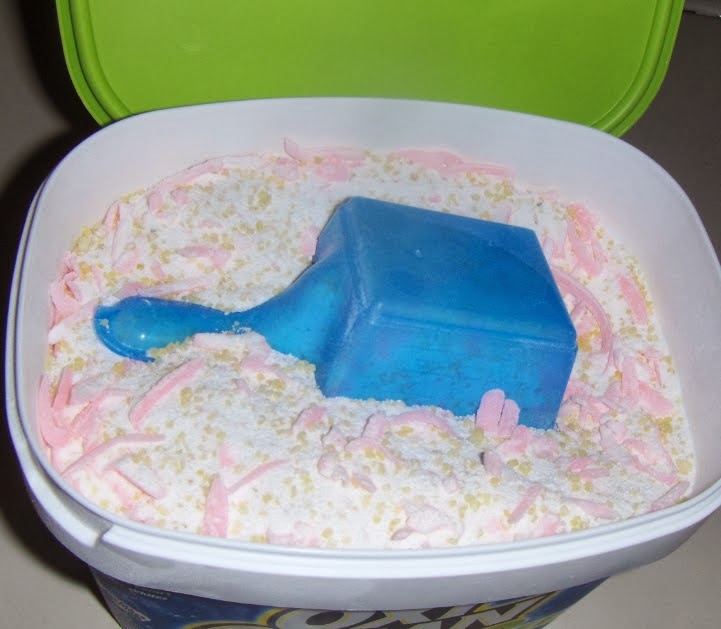
Step 2: Mix it all into a large bucket! I use a recycled 5 gal. bucket from my hubby's pile in the garage. LOL  - I pour ingredient's into the bucket in layers or parts outside- because - well the powder can Poof! LOL and frankly I do not want Poof! in the house! ;) , Mix it all - well-  with large ladle or slotted spoon and then--- done! Yay!!!!!!!  It's as easy as that!

Step 3: Use it!   I recycle the OxyClean container and the scoop that comes with it. Fill it with my mixture and this sits on my washer for daily use. A large load to the 2 line on the OxyClean blue scoop is perfect!

Note: The remainder of the mix, I store in the garage (keep in a cool dry place, away from the children and label) , refilling as needed.

Also to note: because this is a low suds recipe- it is safe for HE washers, and does not leave a residue like some castile soap mixes can.
It lasts! About 6 months- or longer depending how often you do laundry. The cost is a whopping $35.  ---- (compared to the amount I paid before- averaging $20 a month, or more, on soaps- that's a previous cost of  $120 for 6 months of soaps- and I just paid less than $35 actually because I caught everything on sale. Savings $85. For me, this is a no brainer!)

Easy! Done! Enjoy!


You might Like the Links at:
Make Your Own Monday Link Up 12/16


If you can't find items at your local store- You might try:


Disclaimer: Affiliate Links in no way affect your end price, there is NO increase for you. But, they do help to support the cost of the blog. Thank you.

Thursday, December 5, 2013

Good Smells for the Home - Quick and Easy

Good Smells for the Home - Quick and Easy

Today I checked the orange tree in our backyard; pulled the most ripe citrus I could find. Better now than tomorrow, I figured. Because our local weather is predicting a Hard Frost warning tonight, 31 degrees F.
Snow is coming Friday and Saturday.
On my orange tree, I fear some of the top fruit I didn't get today could be bit; but there wasn't much time.
I might have to brave the ladder tomorrow and see what I can salvage.

Today, however, I was after the ripest sweet treats! Oranges are fantastic fruit for the cold weather- to ward off sniffles -and one of the best grab and go treats I can offer the family! 


Bringing in the oranges today sparked an old favorite whim- the smell of fresh orange and cinnamon! But I personally do not do well with commercial potpourri that is soaked in chemicals and heavy on perfumes. I prefer to go natural, and it is so easy to do! Also a huge money saver! Frugal Home Recipe ! Makes the whole house smell great!

Stovetop Potpourri
On the back of the stove, I cut up 2 oranges, and added water to fill the pan and 2+ cinnamon sticks- and set it to simmer. You can use ground cinnamon as well! The wonderful smell soon came from the kitchen! Inspiring! Inviting!  Wonderful! Yay! A Fall favorite anyone can do!
 It Took less than 2 minutes and I had simmering potpourri for the rest of the day! So easy!  Made the house smell fantastic! Loved it!
(Note: simmer the potpourri mixture, and check the water off and on all day, It will run out! Don't forget to check. Simply add more water if you need. Be sure to turn off if you leave, or head to bed!)

It can be done with any citrus! Oranges, Lemons, Limes!  And different spices! Anise, nutmeg, ginger, cloves, cinnamon! or Mint! Whatever combo strikes the inspiration in you! Even just the smell of simmering cinnamon can be a welcoming change! Try apples! Ahhhhh! Fantastic! Aromatic and romantic! and best yet- all natural.

Hope you might try it! But be careful! You might end up absolutely LOVING it!.


You might like the tips shared at:
Frugal Days Sustainable Ways #100


You might like these items:


( Disclaimer, the links above are affiliate links. Affiliate Links in no way affect your end price, there is no increase for you. But, they do help to support the cost of the blog. Thank you.)

Tuesday, July 9, 2013

DIY (Fake Shout) Laundry Stain Remover


DIY (Fake Shout) Laundry Stain Remover 


1 cup water
1/2 cup hydrogen peroxide
1/2 cup washing soda

Combine all ingredients well and pour into empty hydrogen peroxide bottle.(Hydrogen Peroxide requires dark bottles as sunlight decreases it's effectiveness.) Cap with spray bottle lid.

Pre-treat laundry by spraying directly onto stain, 5 minutes before tossing clothing into load.
Very similar to Shout- without harsh chemicals or toxins.

Another Green Clean! Yay!

For delicate material, or brightest colors- test a small spot first  to ensure doesn't bleach out color.
Great for whites, kid's clothes, ring around the collar and grass stains.

Label clearly, store with your homemade laundry soap, and keep out of reach of children.
(Note: Washing soda is more caustic than baking soda, and thus not recommended to eat  Be sure to label clearly.  To make your own Washing Soda: DIY Laundry Soap and Washing Soda.)


You might like the links at:
Mondays Homestead Barn Hop #118

Make your Own Monday 7/8


You can find items here:


Disclaimer: Affiliate Links in no way affect your end price, there is no increase for you. But, they do help to support the cost of the blog. Thank you.

Monday, July 1, 2013

DIY Greasy Hand Cleanser

 DIY Greasy Hand Cleanser


Have a man in the house always working on something? Mine is...
He was a Diesel Mechanic for Railway for many years. I learned over that time there is nothing to use against Cosmoline (a railroad mama's nightmare!) However, the regular grime and grease out that can happen with cars and small engine's is another story. And yes,  I have an answer for those greasy grimey hands that can often need extra strong cleaning.

DIY Greasy Hand Cleanser

1/4 c salt
1/4 c baking soda
1/4 c sugar
3/4 c Dawn dish soap-The blue stuff - (+-)
10 drops Tea tree essential oil (for anti bacterial properties) Lemon works well too! Or both. 
1 tbsp bentonite clay (optional -if you really need extra power)

In a tub that's reusable, but not breakable- (I used a rubbermaid tub that holds at least 2 c liquid) 
sift together the dry ingredients until thoroughly mixed. Add dawn dish soap and mix until thoroughly incorporated. If too paste- like, you can add more dawn until it comes out creamier, but not too liquid. You want the scrub capabilities!
Have that guy scrub, and rinse with warm water.

Works well as gardener's mix too. Especially after a long day in the dirt! :)Yay!

Better smelling than the orange gunk they usually use in the shop- but very effective. Better for them too, but you don't have to tell them that.   ;)


Shared with, and you might like the links at:
Monday's Homestead Barn Hop #117

Frugal Days Sustainable Ways #79


You can try:


Disclaimer: Affiliate Links in no way affect your end price, there is no increase for you. But, they do help to support the cost of the blog. Thank you.

Tuesday, June 4, 2013

Slow Cooker Stuffed Cabbage

Slow Cooker Stuffed Cabbage


Cut  and wash half a cabbage pulling leaves apart as whole and large as is possible.

In a bowl, mix:
2 lbs ground meat ( you can use hamburger, ground beef, ground sausage, ground turkey or chicken)
1 cup bread crumbs
1/2 cup oats (if using ground turkey-or chicken eliminate the oats as this will be too dry a mixture to hold)
2 eggs
seasonings - pinch of cumin, paprika, garlic powder, salt and pepper.
(Other seasonings that are really good in it are  basil, oregano, green onion, minced garlic, chopped onions, etc.)
Combine all ingredients in bowl, and form med sized  meat balls - wrapping each ball with cabbage and place in the slow cooker/crock pot. Add all unused cabbage to the cooker surrounding the stuffed leaves.

Fill the remaining spaces in the casserole with cleaned and cut potato and carrot wedges.

Pour over all of it 1 quart jar of homemade canned tomatoes -which is  my favorite-juice and all- and  cover. Cook on high for 3-4 hours until meatballs are completely done in center.

That's it- additions to the casserole can include celery, carrots,  onions, squash, whatever you feel would match the cabbage taste. You can use canned tomato sauce, or tomato soup instead of whole tomatoes if you prefer. So easy- so versatile. And very filling!  Serves at least 4-6.  I usually have left overs, making this one of my favorite frugal recipes!. Enjoy!


you may also like the links found at:
Frugal Days Sustainable Ways #75


You might try:


Disclaimer: Affiliate Links in no way affect your end price, there is no increase for you. But, they do help to support the cost of the blog. Thank you.

Wednesday, May 29, 2013

DIY Homemade Seasoned Bread crumbs

DIY Homemade Seasoned Bread crumbs


I love bread crumbs. Since I bake more than fry- a good coating for us starts with bread crumbs. Chicken, pork chops, scotch eggs, what ever - a good quality bread crumbs recipe can make or break the flavor. Making my own eliminates the boxed/convenience food problems of added preservatives and or chemical flavorings. Because I'm using up day old pieces of bread, it's frugal and really promoting no extra waste.

One of the best features of making your own bread crumbs is you are not limited in what you use- Homemade bread, white, whole wheat, sourdough, Italian, rye... it simply does not matter. Flavors can pop from trying different breads! The only limit is your imagination!

I have made my own croutons and bread crumbs many times in the past- I would toast bread, and grate it. However I have discovered a new and actually easier way to make my own bread crumbs- I got my own dehydrator! Yay!!!!! Love this thing!

Seasoned Bread Crumbs using the dehydrator

I place in the dehydrator left over bread. Day old is fine- heals are fine! I put the dehydrator on 125F and leave it for a couple of hours- I have a batch going right now- they have been drying for about 4 hours now- I'll check them soon. I want them to be so dry when I pull them out that they crumble easily between my fingers. Drying times can vary depending on the weather- more humid days require more time; also varies due to thickness of the pieces you use.

Once dry, I place the bread into the food processor
 and grind them up into tiny crumbs. If you don't have a food processor- no worries! Place the bread into a zip lock or any bag without holes, and use your rolling pin to crush the bread into crumbs. It's easy and doesn't take that long to do.

I personally like to pour crumbs  into an a recycled Parmesan shaker, adding spices that I want and label it clearly. I find nothing wrong with having a couple shakers- each seasoned differently sitting ready to use!

One of my favorite bread crumb mixes is Italian seasoning (2 tbsp.to each cup of bread crumbs)  added to a shaker of bread crumbs. I mix thoroughly to ensure they shake evenly.

Another excellent addition is garlic and onion flakes (1 tbsp. each to each cup of bread crumbs).  I personally like a an added tbsp of dried parsley with this. Gives it a nice color.

To spice things up you can add 1 tbsp. chili powder; or a combination of cayenne, paprika, and cumin. Adding in dried red pepper flakes would be a colorful addition to the heat. Use your imagination and tastes to create!

A friend of mine mixes in Parmesan cheese with bread crumbs- 1:1 ration. When I tried this- it served as an awesome touch sprinkled over Au Gratin potatoes, baked Zitti, or Lasagna! Yay!

On an added note!
For my readers who prefer to store using only glass, I love the fact the lid to a Parmesan Shaker fit perfectly to a regular mouth canning jar!!!!! Yay!  :)


You may love the links shared at:

Frugal Days Susutainable Ways #75


You might like to try:


Disclaimer: Affiliate Links in no way affect your end price, there is no increase for you. But, they do help to support the cost of the blog. Thank you.

Using the Whole Tomato

Using the Whole Tomato


I'm tired of wasting. I am learning to make the most out of everything! Homemade anything is so awesome for the simple fact that I know exactly what is in the product I make. All natural, no preservatives or fake food chemicals.  I am loving using every part of the fruit or vegie that I can.

This weekend we canned Roma tomatoes. Love the way the cans fill my shelves, and I know I have a quality canned tomato without extra chemicals ready to use- makes awesome sauces, and soups!

A wonderful guide to canning exists on this page: Pick Your Own.org Canning Tomatoes
I could attempt to tell you the entire process, but their tutorial is so thorough that it is better to just let you know where I learned it from that try to copy cat their process. 

One thing I would like to note is: 
Be sure to always wash your produce: I use a cup of vinegar to a pan of water and let them soak in it for 10 minutes. It is so important to get the residues off the skins, you just never know- and the process is so easy.
A simple note and measure to ensure no one gets sick and your food is healthier for your family.


One of the steps taken in canning our tomatoes is to blanch them and remove the skins. In past I did this without thought- and tossed the skins!  But no more! What a waste!

Three wonderful things can come from the tomato skins! 

1. You can use them in a crock pot along with other vegie left over and cuttings and start a pot of vegetable broth.  A great blog about this is found at: My Humble Kitchen
2. You can put all the skins into a food processor and grind them into a pulp for tomato bark! Dehydrate the pulp, and yay! You have instant tomato paste later for anytime you need it! tomato bark
-or-
3. You can dehydrate them, as I did this time. The end result was wonderful flaky dried tomato,  that I whirred into the food processor for a minute until I had small flakes and poured into a recycled spice jar to add to my new homemade spices! Instant tomato flavor to add to anything! -All natural, all homemade.
I laid the tomato skins  on my dehydrator racks, set the dehydrator for 135F and let it go for about 10 hours to be sure we were completely dry. Times may vary due to weather and humidity. We had a cloudy weekend, so I wanted to be certain I got all the moisture out.

<-- this is how we started
        this is what came out ----->


<--I tossed these into the food processor

and this is my end result-
 pure tomato flakes! -->


Love it!


No waste, and a new spice jar for my cabinet! Awesome!!


You might also like the links found at:

Frugal Days - Sustainable Ways #74

Wednesday, May 22, 2013

DIY (Fake Comet) Cleaner

"Honey! Where's the comet?!"

My Hubby had to do some clean up last night... I handed him my DIY cleaner - fake comet version- he glanced and didn't say a word. The look was enough- a kind of  'well, if I have to'...a glare that says it all. I left with a grin. :D...no worries!

He later told me it worked fine! By his standards, that's a huge compliment. I knew it would- I'd already used it for a while! But for him- it was new. LOL
It's simple to make-

DIY (Fake Comet) Cleaner

I reused/re-purposed a shaker  bottle and added to it
1 part baking soda
1 part borax
1 part salt
1 part washing soda

and I shook it to mix.
Sprinkle it on what you have to scrub just like you do comet. Take a damp sponge or scrubber, and watch the stains go away. Rinse well.
 Works wonders on the tub and toilet! Love it! Whitens, brightens, grime is gone, cuts grease and residue, without bleach alternatives and extra chemicals.
 No noxious smell. The baking soda naturally deodorizes, borax and washing soda cut grease and residues and whitens, and the salt acts as abrasive- it's a win win.
 That's it. Done. Can't get much simpler. DIY. Effective. Frugal. Green cleaning. No noxious smells. Just clean.
Yay! 


This post is also shared in: (And You might also like what you find on:)

Homestead Barn Hop #114 

Frugal Days Sustainable Ways #73


http://www.yourthrivingfamily.com/


You might try:


Disclaimer: Affiliate Links in no way affect your end price, there is no increase for you. But, they do help to support the cost of the blog. Thank you.

Monday, May 6, 2013

DIY Homemade Dish Soap

DIY Homemade Dish Soap


Dish soap is so cheap, and so easy to grab, and just too easy...why would I replace dish soap?

Many reasons, actually.
It touches your skin- one of your most important organs on your body.
It touches the dishes you cook and eat off of.
It goes down the drain and flows back through the system, eventually retouching the earth we come from and live off of.
All Three very good reasons to consider using a product with far less toxic chemicals in it. Think green.
Green cleaning is so easy, it is even cost effective if your are on a tight budget.  It is also so much better for your family in the long run!

To make Homemade Dish Soap

you need a mixing bowl, a small sauce pan to boil water in, a grater and a whisk.
2 cups water
1 tbsp. borax
1 tbsp. grated Castile soap bar. (I use Kirk's Castile Original, but any Castile bar will work. Dr. Bronner's Citrus is excellent!) 
Essential oils (lemon is my favorite- but you can also use tea tree oil for antibacterial, or any combination you prefer! Lemon and Lavender is wonderful! So is orange and lemon for a bright energetic citrus smell of fresh and clean!)

Boil the 2 cups of water in sauce pan.
In bowl combine both the borax and grated bar soap
pour boiling water over the soap mixture and whisk until the soap dissolves.
Now let it rest. As it cools it will gel up.
Let it completely cool for a couple hours. 4-6 actually depending on your house's temp.
Add essential oils, if you choose to,  at the very last step.
Pour into recycled/ reused dish soap bottle and use as you normally would for dishes.


Note: This is not intended for dishwashers-just in the sink dish-washing.


Saturday, May 4, 2013

Baked Tilapia- a meal in under 30 minutes!

Tilapia is so easy! I love this fish! You can fix it in less than 10 minutes and serve all within 30 minutes!
All You need is:

Baked Tilapia

Butter
6-8 Tilapia fillets
Salt and  black pepper
Garlic Powder
paprika or Cayenne or cumin -your choice
1 lemon or lime

Preheat oven to 375  F. Coat a baking sheet with butter.
Rinse fish and pat dry between paper towels; place on buttered baking pan. Season each fillet with salt,  pepper and garlic powder, and paprika (or cayenne seasoning), and sprinkle of lemon juice. Some add a small pat of butter on top of each filet.  Bake in the oven for 15- 20 minutes.You know it is done by testing one piece, flakes apart easily with a fork.

 For Tilapia Fish tacos

Bake Tilapia as above, but use the cumin or cayenne or chili seasonings
serve on warmed small corn tortillas with shredded cabbage and chopped cilantro and a lime to squeeze over.
toppings may include:
salsa
chopped tomatoes
chopped green onion, yellow or red onion,
shredded cheese (not a traditional topping but preferred by many Americans)
sour cream (not a traditional topping but preferred by many Americans)


Tilapia is one of my favorite fish to make and the price is usually right, fits my budget perfectly and if making fish tacos- I can make so much with it; it works perfectly for feeding more people. Healthy, and perfect for company coming over! Yay! Love love love it!


You may  also like the Real Food links found at:  
Real Food Wednesday 5/29/13


You might like to try:


Disclaimer: Affiliate Links in no way affect your end price, there is no increase for you. But, they do help to support the cost of the blog. Thank you.

Friday, April 26, 2013

DIY Olive Oil Sugar Scrub

Sometimes, the easiest of things can create big changes!

I worked in the tourism industry for quite a few years when living near the Grand Canyon. When you are working with the public (I was a florist for 8 years, then worked front desk for another year) -you see a lot of faces from many different places, and they see your face and your hands when you hand them what they need. Clean hands, smiling face and warm friendly service.
A common side effect of working with the public, is washing your hands often. Antibacterial soap does it's job but it can ravage your skin! Mine would get dry and cracked if I didn't take drastic measures. This happens to be another case for me, of "if I knew then, what I know now.."which seems to be a running theme in my life! LOL

The easiest answer I have found is in my kitchen and readily available. I recycled a jar and cleaned it- filling it with sugar and olive oil. It now resides beside my soap pump at the sink. I refill as needed, no recipe really needed. Sugar soaked in olive oil. About a 1/4 c olive oil to 3/4 c sugar.

After cleaning up, when the sponges and cleansers go down for the day, and I am ready to relax with the family and enjoy the night- I wash my hands, and then I sugar scrub.
The sugar cleans and exfoliates. Rubbing vigorously warms my hands and the pores open up, improves circulation, and eases muscles. The olive oil goes to work moisturizing healing and protecting. Olive oil is rich in antioxidants, especially Vitamin E. The olive oil has an added benefit of being extremely good for cuticles and nails- be sure to rub into cuticles.  Scrub for a minute, until the sugar starts to dissolve, and rinse with warm water.

I no longer have to purchase expensive, and chemical laden hand lotions again. I had everything I needed right there in the kitchen. :) Done. easy. All natural.Very Frugal when considering the cost of hand lotions today.

A simple easy answer to dry, overworked, cracked hands. I do not have a model's figure or modeling hands- but you can see below- no alligator cracks, no dry patches, no unsightly exzema- just soft hands.


you might also like:
Frugal Days Sustainable Ways #77


You might try:


Disclaimer: Affiliate Links in no way affect your end price, there is no increase for you. But, they do help to support the cost of the blog. Thank you.

Tuesday, April 23, 2013

Seasonings: dehydrated vegies

Making your own seasonings:

As I am cooking, I go through seasonings like there is no tomorrow! Especially garlic powder, onion powder, dried onion, and garlic pepper! We are garlic fans! Haha! I have found, though, that the flavor just zings! if I add my own dehydrated vegies to the mix!  Whether they are fresher and haven't sat on a shelf forever, or what, I don't know- but making my own dehydrated vegies into seasonings is wonderful! And soooo easy! Dehydrated vegies do not lose their nutrients, and if stored in a sealed jar (I store mine in a Ball jar)  or in a closed recycled seasoning jar stay fresh for weeks!

On this particular batch I dried 2 yellow onion, a bunch of green onions, Fresno chilies, garlic, and carrots. (Bell pepper, tomatoes, any chilies, any onions, celery, basil, parsley, spinach, and kale work wonderful too!)

 In dehydrator set at 135F for 8 hours, then after cooled I tossed them into the food processor, and pulse until they came out small enough to use for a recycled seasoning shaker. If I have made enough I sometimes store it in a mason jar. Either way- amazing on meats! Great for addition to bone broth for quick soup! Fresh and no preservatives! No MSG.  
 So easy- it becomes fun to experiment with! Invent your own soup spices: add pepper, add sea salt, add cumin or chili spices! What ever your fancy! Invent your own unique combos for healthier foods.


If you do not have a dehydrator:
Line a rimmed baking sheet with parchment paper. Cover with slices of vegies  (about an 1/8 to 1/4 inch thickness.) Place the baking sheet in the oven. Heat the oven to lowest setting below 140f. Perfect range: 135-140°F. If you have a convection setting, use it, it will speed up the process and help dry out the vegies in half the time.  Let dry in the oven like this for as long as it takes for the vegies to dry out and crisp; so about 6-8 hours, check at 6 hours for thin vegies and smaller pieces.When you can pick it up and snap it between fingers- it's ready. Cool. and process.

For idea for making real tomato flakes as seasoning try: Using the whole Tomato

Or making Tomato Bark: Tomato Bark


Regarding long term storage: With gardens beginning to produce, this is perfect way to save vegetables and not create waste! Mine never last too long.  However, being dehydrated and if sealed properly and stored in a cool dry place they could last years. Excellent for small mylar bags with oxygen absorber to create long term storage. Healthier than alternatives with preservatives and better consider you have the ability to create mixes that are personalized to your taste! Yay!


This has been shared with  &
You might also like the Real Food links at:


Real Food Wednesday 6/19

Common Sense Preparedness Link Up #7


You might try:


Disclaimer: Affiliate Links in no way affect your end price, there is no increase for you. But, they do help to support the cost of the blog. Thank you.

Real Food snacks: Fruit Leathers

Real Food Snacks: Fruit Leathers
When talking with my husband and boys about the real food challenge, and writing about it; they jumped in with a request I post my fruit leathers. According to them, this is the biggest of all the changes. These have been a fantastic snack alternative to candy bars, etc.  Along with simple dried fruit for snacks(banana chips apple chips, dried pineapple), I always keep something of this on the counter readily available for anytime they need it. 


Apple Fruit Leather
1 jelly jar of apple butter (Homemade and canned, gala apples simmered with honey and cinnamon for 10 hours in crock pot until fully reduced, and canned in jelly jars) or 8oz applesauce!
1 7 oz jar homemade plain yogurt
1/4 cup honey
mix well and dehydrated in dehydrator on 135 degrees for 6-8 hours until leathered
pulled off and cut warm, wrapped in wax paper rolls. sent easily in lunches for snack.
Pina-Coco Leather
1/2 pineapple cored, skinned, and cut into chunks
1 cup shredded coconut
1/4 cup organic honey
Combined all in food processor  and pulse until smooth,  (this one will always appear slightly chunky- get it as smooth as possible). Spread flat on dehydrator tray. Dehydrate for 6-8 hours at 135 degrees. this one comes out a bit stickier, thicker- remove from sheets and wrap in strips on wax paper while warm. Delicious pina colada flavor.

Pina-coco leathers are not as pretty but just explode in taste:

If you do not have a dehydrator:
Line a rimmed baking sheet with wax paper. Pour out the mixture into the lined baking sheet to about an 1/8 to 1/4 inch thickness. Place the baking sheet in the oven. Heat the oven to lowest setting below 140f. Perfect range: 135-140°F. If you have a convection setting, use it, it will speed up the process and help dry out the fruit in half the time.  Let dry in the oven like this for as long as it takes for the fruit mixture to dry out and form fruit leather. We usually keep it in the oven overnight, so about 8-12 hours for the thicker leathers, check at 6 hours for thin leathers like apple. The fruit leather is ready when it is no longer sticky, but has a smooth surface.