Showing posts with label Coconut Oil. Show all posts

Wednesday, November 27, 2013

Janey's Pumpkin Pie

Janey's Pumpkin Pie 


Pie Crust:

2 c flour
1 tsp fine real salt or sea salt
2/3 c real butter, or coconut oil (Note for taller, flakier crust use Lard)
1/3 c cold water
Pulse butter (cut into cubes) and salt and flour in food processor until crumbly.


Add water and pulse until ball forms.Or in a bowl, add cut butter and flour and salt, and use pastry cutter to mix- mixing until crumbles begin and then add water to ball.

Lay out on a flat surface, cut ball in half (makes 2 crusts) roll out flat to fit 9" pie plate, pinch edges of crust. let rest 15 min before baking.

Filling:

1 can Pumpkin Puree (15 oz)
1 can Coconut milk (13.5 oz)
2 egg yolks
1 egg
3 tbsp honey (or sugar)(Note: for sweeter pie increase to 1/4 c, I prefer to taste stronger pumpkin.)
4 tsp pumpkin pie spice (or 2 tsp cinnamon, 1 tsp. ground ginger, 1 tsp nutmeg)
1/2 tsp fine sea salt (or real salt)

Preheat oven to 425 degrees F.
Blend with whisk pumpkin puree and eggs until smooth. Add spices, salt and honey and the coconut milk. Whisk together until creamy smooth.


Pour into pie crust filled pan (9"). Tap to release air bubbles. (Foil around the edges if you do not want dark brown - I forgot this! But I'm reminding you! ;P!  )
Bake 15 minutes. @ 425 F. Then Turn down oven to 350 degrees F and bake remaining time until set- about 40 min. Butter knife inserted toward crust edge should come out clean.

Let cool completely. Serve with Whipped cream and enjoy! 


You might like:


( Disclaimer, the links above are affiliate links. Affiliate Links in no way affect your end price, there is no increase for you. But, they do help to support the cost of the blog. Thank you.)

Tuesday, November 5, 2013

Lavender For the buggy bites!

I spent a lot of time outdoors this summer.  Outdoors is wonderful, fresh and healthy! But occasionally buggy. I realize the bug season may be diminishing with the winter coming on; but I thought it still worthy to note. I will never again race for the anti itch topical creams or the over the counter bug bite relief. I will grab my essential oils. Specifically - Lavender.

Lavender is fantastic for anti-inflamatory, analgesic (pain relieving), anti bacterial and skin and wound healing properties!

For me, Within seconds of applying 1 single drop on top of a bite- the itch of a mosquito bite was gone. Within a day, evidence of it drying up was there; and it was gone in 2days. Lavender oil saved me from  the itch and scratch and sped up the healing process!  I was sold!

Then I tried it on a particularly nasty mosquito bite my son had on his leg, when it healed the same way- I was sold. For the rest of the summer that's all I grabbed! Worked exactly the same for the spider bite my older son got and then again for ant bites we experienced at one BBQ!

An extra bonus is the scent of lavender is known to be a de-stressor, soothing and calming- great for keeping the edge off the day! 

Also worthy to note: Flies and ants do not like lavender- absolutely fabulous to plant in your garden around the picnic areas!  When we BBQ'd I'd mix a drop of Laveneder Essential oil with a tsp of coconut oil and rub it on my feet and legs before going out and wasn't bothered by flies or ants like some other people.

For more information on Essential Oils, their properties and uses: I recommend Lea Harris- who has a wonderful site full of extra information and recipes at Nourishing Treasures . One in particular, that I recommend is her : Itch Be Gone .

Lavender Essential Oil!   May my medicine cabinet never be without it! Haha! :)

You can find Lavender Essential Oil at many health food stores.
Or try:


You might also like the links found at: Wellness Wednesday November Link Up 11/6

Sunday, November 3, 2013

Returning to Home -

It was breezy and the small wind seemed to increase a bit, but nothing prepared us for the gust that came! Suddenly it gusted 3- - no 40 - no 50 mph! picking up dirt, debris, bits of tree branches flew by. The gust didn't end - it increased! dirt and sand in the eyes- we couldn't see the road any longer- so thick was the wall of dirt going by-  the umbrella for the table picked up and flew 10 feet into the pool, trying to grab it and save it and nearly fell in -then continued blast- trash and tree limbs flying across the parking lot... a dust devil the size of a small tornado picked up large tumble weeds and threw them into a whirl 200 feet up in the air... it kept going....until it was gone.
... just as suddenly as it started....
I saw this happen last month.

 An actual occurrence, that turns out to be a perfect analogy for our lives this last three months.

A whirlwind, a tornado of events, turmoil, upheaval, and then sudden calm.  Discovering how to survive a storm and still smile with little left.
I am not comfortable giving out whole details, but in short- we were buying a house, the seller backed out 5 days before escrow, everything fell through, and three months later- after multitude of events such as losing cars and jobs- we are finally back in a rental house.
It is now a week after our move and I am still going through boxes, and discovering where things might go and basically...settling down.

Whew.
I never intended to be away so long.

I learned a great many things during that time and I want to share it all with you, I just have to figure out how to word it all. I missed writing!
The three months covered the bulk of summer here. The hottest months- we did a great deal of swimming and walking.
Many hours got spent outside- and we enjoyed the BBQ many nights, rather than going out to eat fast food. I found out just how bad I could feel after nasty fast food. (McD's made me feel like I had poisoned myself into a sluggish grease pit, I wasn't alone! Everyone including the kids agreed!)
Oh, how I missed real food! I craved home cooking daily. We all craved it after just a week of not having it! The BBQ helped, but really  nothing compares to homemade lasagna fresh from the oven (our voted most missed food 2nd was baked chicken).

 I missed my All natural cleansers and safe cleansers. I used baking soda whenever I could but could not escape the motel cleansers etc.

In the heated outdoors, I discovered Lavender Essential Oil is fantastic for mosquito bites, and spider bites, and virtually eliminates all itching! It also deters ants and flies.

I discovered my small jar of coconut oil could become far more than cooking oil, it turned into my daily moisturizer, my hand lotion, and a soothing answer for sunburn!

I discovered my bottle of castile lavender soap could wash dishes, be a hand and body soap, and shampoo!

I discovered that even in trying times and adversity I still could not compromise my beliefs that natural is better than the convenience products sold on the shelves. All in all the experience was like a test for all of us- did our steps to go real food and more natural before really take hold? I'd have to say a resounding YES!!!!!

So happy to be back! So happy to be able to write it all again!

As I unbox and unravel from the past summer- I hope to start sharing everything again. Thanks to everyone for following and thank you for your patience!

-Janey
a truly Consistently Sporadic Writer


Friday, June 14, 2013

Peppermint Sugar Scrub for tired feet

Peppermint Sugar Scrub


Tired aching feet?  Peppermint will help save the evening and help you to relax!

Try this simple sugar scrub to revive:

Peppermint Sugar Scrub

1/2 c sugar
1/8 c good quality oil- I suggest olive oil, coconut oil, or sweet almond oil.(-you want enough to coat the sugar but not drown it.LOL)
10-20 drops Peppermint essential oil

Soak feet, if you have time in Epsom salts. The magnesium is absolutely wonderful for you! Then use the scrub at end.
If not enough time available to soak: wet feet with warm water and  use the sugar scrub- rubbing in circular motion across the bottoms, and get every part -between the toes, tops of the toes,  the ball of the foot, the heel, back of the ankle- rub and invigorate the blood flow to your feet, enjoy the cool peppermint, until the sugar begins to dissolve. Rinse in warm water. :) Wipe dry. Smile. Take a deep breathe- the peppermint scent helps to ease away some of that long day head ache too.


If you've been bare foot all day- and your feet are looking dingy from playing outside or chasing the kids.... another invigorating scrub is 1/2 c sugar, 2 tbsp.  Peppermint Castile Soap, 10 drops peppermint essential oil, and 1/8c olive oil or almond oil. Scrubs the dirt and day right off quickly. Leaves your feet soft and clean and smells invigorating! Works like a charm! :)

Store the remaining sugar scrub in a non breakable container with lid (I reused a small rubbermaid tub with lid;  some prefer a glass jar with reusable lid), clearly label, and sit in a cool place like the bathroom shelf- ready for next time you need it! Lasts a few weeks- I'm not sure about longer as I never have it last that long! :)


This has been shared on, and you might love the links in:

Make Your Own Monday Link Up 6/17

Natural Living Monday-9


You might like to try:


Disclaimer: Affiliate Links in no way affect your end price, there is no increase for you. But, they do help to support the cost of the blog. Thank you.

Thursday, May 23, 2013

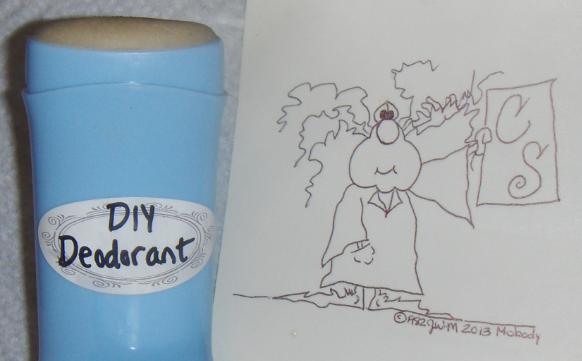
3 DIY All Natural Deodorants - and why you might want to try them

3 DIY All Natural Deodorants

DIY All Natural Deodorant -Stick  

1 Tbsp. beeswax
2 Tbsp. coconut oil
1 Tbsp. shea butter or coconut butter
1 Tbsp. cornstarch or arrowroot powder
1 1/2 Tbsp. baking soda (aluminum free)
1 Tbsp. bentonite clay (I used Redmond)
1 /4 tsp. Vitamin E oil
10 drops tea tree essential oil
10 drops lavender essential oil
10 drops lemon essential oil

In a double boiler, melt beeswax and coconut oil first, then add shea butter (shea cannot tolerate high heat as well, and  needs to be melted last- do not boil just reach melt point and stop). Once melted, remove from heat and add cornstarch and baking soda and bentonite clay- Stir well to incorporate until smooth. Add essential oils and Vit. E oil last. I used lavender/lemon oil as it is my favorite scent, but you can change the essential oil to whatever you prefer. (A citrus fresh blend could include lemon and grapefruit oil, or lemon and orange.) Pour mixture into new or cleaned re-purposed deodorant stick. Let cool over night without the lid, 24 hours. Use as you normally would- thin layer, this actually requires less than commercial brands to be effective and thus lasts longer.
All natural  and chemical free!


- or -

DIY All Natural Deodorant - jar version.

5 tbsp. coconut oil
1/4 cup baking soda (aluminum free)
1/4 cup cornstarch or arrow root powder
1/4 tsp Vitamin E oil
lavender essential oil

In small bowl mix with spoon all ingredients except essential oil.  A small jelly jar works fantastic for this, or you can reuse any old cold cream jar  that's been cleaned and has a good lid.  Add essential oil last- 10 to 20 drops of your favorite scent will do. Lemon gives great fresh citrus scent. My favorite is lavender, but the choice is yours. Because this is mostly coconut oil, it can get liquid in heat, best to store in cool place. Take a small amount on finger and rub into arm pit area, soaks in quickly and works well!  
simple, easy, all natural  and chemical free!


- or -

DIY All Natural Deodorant - Spray bottle version.

1 small mister spray bottle
rubbing alcohol
tea tree essential oil
in bottle, fill with rubbing alcohol and add 10-20 drops of tea tree oil. shake well. Spray onto armpit area.
easiest version possible, and seems to be preferred by men, you can add any essential oils you'd like to create a scent preferred. the tea tree oil is an excellent start having antibiotic, anti fungal, anti viral and antibacterial properties.

:) 
I have tried all 3 versions personally. I am most pleased with the stick; but the jar version was wonderful. Simple and easy to make. I encourage anyone and everyone I know to try it. It's easy to get used to, easy to make, and  it works. You won't stink! Really!  You won't! :)


Why DIY deodorant? 


 Why would I, or anyone else, go to the trouble?

For me it is simple-Cancer causing Chemicals.  The statistics for women with breast cancer is constantly rising. I believe it stands right now at 1 in 5 women will be diagnosed with breast cancer in their lifetime. My mother, my mother-in-law, and a very close friend have survived it. My step mother did not and we lost her this last year. That is 4 women I know - I can count myself as 5. That means, in that group, 4/5 have dealt with breast cancer. Not great odds. That's not a possible hypothetical statistic that mildly sounds concerning- that's actual numbers.
Commercial deodorants often contain parabens, propylene glycol, cyclopentasiloxane, chemical fragrances, talc made with asbestiform fibers (asbestos), and aluminum. Many of these are attributed to causing cancer, or other neurotoxic effects. 
New research suggests that many of the breast cancer cases today began with the lymph nodes in the armpit area. It does not take a brilliant mind to figure out that putting cancer causing agents in the armpit area in order to deodorize and smell pretty- might actually be contributing to the rise in breast cancer over the last number of  years. I am not saying they are the sole cause- but certainly they cannot be helping at all.
I personally do not see the reason to take the chance; not when I know I can naturally create an alternate that is safe to use and actually works!

If you are uncertain - don't take my word for it-  research this for yourself- PLEASE!!!   A fantastic resource for checking the ingredients in the beauty products you use is: Environmental Working Group Skin deep database

This is why I make my own deodorant- happily. I hope more and more women out there start to as well. All natural, effective and actually really easy to make.


You can find the ingredients at this site:

 
Mountain Rose Herbs. A Herbs, Health & Harmony Com 
 
 
you might also like the recipes and links at: 
 
Nourishing Treasures Make your own! Monday link up 

Friday, April 26, 2013

DIY Homemade Body Butter

Back in January I ran out of my body butter, and being in mid winter season- that was a bad thing to have happen. For me, winter dry skin is a definite challenge. Being compared to an alligator is not my idea of sexy- LOL. I need serious help, and I found an answer that's easy and natural. Love it.

DIY Homemade Body Butter
4 oz. Coconut oil
2 oz. Sweet Almond oil
2 oz. Grape seed oil
8 oz. Shea butter
10-20 drops essential oil

In a double boiler, melt shea butter, coconut oil and almond oil  and grape seed oil together. Shea butter takes the longest to melt, stir to help it along. Remove from heat and pour into a medium sized mixing bowl. place in the refrigerator for about 1-2 hours until it chills and hardens. Once it's hard white, whip on med. speed in a mixer for at least 5-7 minutes. At first this is tough, because the mixture is cold, but it breaks up quick and begins to whip. The trick is to mix for a minimum of 5 minutes, any shorter time length and the mixture will not emulsify and combine properly (causing it to separate later). After about 5 minutes you will start to see peaks form and it takes on a whipped cream kind of look. Add essential oils and whip some more until incorporated. (For first batch I added lavender essential oil. But if you love the smell of shea butter you can just leave it be- for a tropical coconut shea smell that's already there.)
 You're done!
 Place into a jar you can lid, and set on shelf. It will harden more in the jar.I recycled my old jar of coconut oil for it- worked perfect!
To use, the golden rule is to realize a little bit goes a long way! Use Too much and it can be interpreted as a greasy mess. Start with just a dime sized portion and spread as far as you can before grabbing more. I have found it is wonderful to keep legs smooth!  This body butter soaks in to the skin in just a matter of a minute and is wonderful! It leaves a light scent, and the alligator dry is gone. I use it right after the shower and since I have started I do not have to re apply lotion later in the day.
This is all natural, and will last on the shelf (if kept in a cool room) for a few months. If you are uncertain about the amount- mix a half batch and give it a try. Contains none of the chemicals of store bought brands, moisturizes and hydrates your skin naturally.


You might also like:
The Holistic Mama Organic Skin CareSkin Care eBook


You might find items here:


Disclaimer: Affiliate Links in no way affect your end price, there is no increase for you. But, they do help to support the cost of the blog. Thank you.

Tuesday, April 16, 2013

Going Nuts! for Coconut Oil!

Coconut Oil for cooking

oh wow- do I love coconut oil!!! Such an awesome wonderful surprise! I cannot sing it's praises enough!

 As a child and teen learning how to cook in the 80's, the new surge of bad, fake and over processed oils was dominating the market. Suddenly media went nuts over highly refined vegetable and Canola oils and margarine -all the products that made the big name businesses lots of money and never were really good for us anyway. 
I wish I had known then...what I know now! How many times have you said that?

I am still learning the benefits of coconut oil. It's crazy good for so many things, it's astounding! 
For cooking alone, it enhances flavor of foods! It doesn't chemically breakdown in the heat of the skillet as fast as other oils (heat stable), it doesn't hurt your body with bad fats, and it's super healthy.  Organic, unrefined cold-pressed coconut oil is higher in antioxidants than any other oil. It is known to boost metabolism, and helps provide greater energy which can lead to weight loss. It is known and proven to boost the body's immune system!

Coconut oil benefits include the fact that it's anti-bacterial, anti fungal, anti-microbial (which means it helps to fight infections)! It's anti inflammatory! It improves thyroid function! It helps with absorption of vitamins so your body takes in more of what it needs, particularly calcium and magnesium-- that means it's awesome for bone support! And new studies indicate it can help Alzheimer's stop symptoms! ( I loved learning this!!) 

There is so much more! You can cook with it just like you did all the other vegetable oils, and get all the added benefits you never got with them! And it tastes soooo awesome! You really do not get a heavy taste of coconut, at first there is a hint- but as it cooks with the food it seems to just enhance flavor of what you are cooking, not dominate it. You can fry, add to baked items, any recipe that calls for vegetable oil- you can use coconut oil!

I personally use either Coconut oil or Extra Virgin olive oil now for all my cooking. Olive oil for light cooking, coconut oil for rich flavors or to add flavor to more bland foods.  I will not buy anymore over processed vegetable oil, or canola oil ever again. It's a choice I feel very good about- a healthier choice for my family. The benefits are listed in the hundreds! At this time, I cannot begin to list them all, and I have not even touched on what it can do for your skin and beauty routine!  Do not be afraid to research the benefits! It is well worth it!


You can find Coconut oil sometimes at the grocery store in the organic section, at Whole Foods, Trader Joes, and Health Food stores. You can purchase it online at  Amazon, and Tropical Traditions


you can also find it here:


Mountain Rose Herbs. A Herbs, Health and Harmony C

Monday, April 8, 2013

All Natural Daily Moisturizer


All Natural Daily Moisturizer

I have become aware of the scary amount of chemicals and fake ingredients that are included in daily moisturizers sold today. It’s amazing, the amount of dangerous ingredients in products sold to be the best.
Nature is best. Your skin is natural, you are natural, so use natural products. What can be so hard about that? 
Many do not consider their skin to be an organ of the body. The fact is, it’s the largest. What you put on it soaks in, goes to your blood stream, goes into cells and structure, and affects you. What you put on it -goes IN it. Simple.
The golden rule for your body’s organs is: If you do not recognize an ingredient, your body cannot recognize it either. This applies to lotions, soaps, shampoos, body washes, deodorants, etc. etc. etc. Anything you put on to bare skin.
But I am addressing replacing my daily facial moisturizer with a natural ingredient. It’s been over a year now, with my new routine, and I cannot be happier! The older I get, the drier my skin reacts to weather changes and exposure. But I have found the easiest answer for me: Grape seed oil and coconut oil.  Grape seed oil is light, thin, soaks in fast and doesn’t leave a heavy greasy feel. It does not clog pores, and it’s 100% natural.  Leaves my skin happy,
In harder weather, harsh conditions require a little more, so I combine 1 tsp. of 100% organic virgin coconut oil and 1 tsp. Grape seed oil into a recycled/reused night cream container and use this instead of Grape seed oil alone. Still doesn’t clog pores, soaks in in just a minute, and leaves my face not feeling dry and taut.
Bye-bye chemicals. Hello Happy skin!