Showing posts with label DIY Homemade. Show all posts

Saturday, January 3, 2015

Beginning a New Year


Welcome 2015. 


I Gladly welcome in a New Year.
I have never wanted a year to be done, and gone, and put to rest, as much as I did the year 2014.
The hardest part for me, personally, in keeping up with the blog was writing during the hardest times. I naturally go silent during troubles or changes. And this year was filled with some whoppers- like hospital visits, near death experiences, 4 separate surgeries, and cancer scares. We lost a lot. We learned a lot.
When I read other people's blogs they present perfect worlds, perfect solutions, and pretty places. I cannot keep up with that. I have to say with sincerity, the world is not a perfect place  and being a blog writer during hardships is difficult at best. I am sorry for long absences and I am grateful for every reader I have. Thank you so much.

That being said, I have to admit- I learned a lot in 2014.

We gardened a serious yard garden for the first time ever. I loved every minute of it.

We canned everything from that garden that we didn't eat right away. I dehydrated herbs like basil and made my own seasoning mixes. I made my own infused oils for both cooking and health (like garlic oil and Calendula oil.)  Fresh salsa was on the menu often. It was wonderful experience for all of us.

As for homesteading, the experience of canning and prepping my own was amazing. I became more of a Prepper than I ever had imagined. And I am so glad I did! I have always thought it wise to stash something for an emergency. My naive mindset was to set to prepare for something big -like a disaster: an earthquake, or a storm.  But I never realized that that list should include personal disasters- like sudden illness, unemployment, and loss.  The list of what could go wrong goes much further than that; but my point is more to make it known that events can occur at a blink of an eye. And preparing ahead of time is smart. I am so glad we did. That stash of items not only got us through- I am making it again as soon and as fast as I can. And I urge others to do the same. Don't wait for the disaster to occur. Give yourself at least a small reprieve from the stress by knowing you are able to provide for your family-for at least a day, or a week. Longer if possible.  The traumatic events causing the need- are enough to go through!  Ease the burden by being able to at least provide for your family for a small window of time. It helps so much, the benefits are immeasurable.
 (I plan to write more on this in the future.*)

During the year, I had some family who visited. We were sitting on my back porch- surrounded by my homemade wind-chimes, my plants and flowers, boxes of herbs growing healthy.  I'd just walked up with my little 6 year old niece from giving her a tour of our garden- her mouth was full of my wild lettuce I'd just let her pick on her own and taste. Her mother reprimanded her- "don't eat that! It's not safe!" to which,  I laughed- "It's as safe as it gets- fresh from the garden, organic, all natural and ready for salad." At this point, my mother in law looked around and bluntly observed, "You are such a hippy."  And that one personal remark struck home. I was flat out called a hippy. At the time I laughed. Never thought of myself as such. But it struck home.

I have thought of it a lot this week. I am. Only they do not call it hippy so much anymore- crunchy, yes. Ha! But I got to thinking of the all natural things I reach for- and the list is amazing. They say if you try something new for 3 months, it becomes habit. I have done that and more- in the two years. A fact that was proven to me this last October when we suddenly found ourselves packed to move to a place that wasn't ready. With everything in boxes, unprepared and unpacked- we spent 1 night at a hotel with nothing. We purchased dinner on the fly and I grabbed 1 box of baking soda. Yes, baking soda. With that box we all had instant toothpaste, deodorant, and bodywash,  and I could wash my hair..... I figured for emergency get through- I'd covered my bases pretty well! LOL  But just looking back on it now- I have to laugh- who does that?!! LOL - me- my hippy self, and I. (grin) guess she called it right. :)
So...
What else do I do?
Ha!

When faced with bug bites, I grab Lavender essential oil. lavender-for-buggy-bites
When I have a stuffy nose I use peppermint essential oil.
- If it persists, I make ginger tea.
For shampoo, body wash, and bath soap I mix coconut milk with castille soap. diy-homemade-body-wash
I make my own toothpaste from coconut oil, Bentonite clay and baking soda.
I make my own deodorant. 3-diy-all-natural-deodorants
I make my own lotions, and face cream. simple-natural body care
I use witchhazel for acne.
I make my own house cleaners. diy-cleaning
I make my own laundry soap.my-mix-laundry-soap
I make my own body sprays.
I make my own lip balms diy-homemade-lipbalm
I cut my own hair.
I use aloe as a detangler, and to stop frizzy curls.100% natural detangler
I eat Real food.
I make my own fruit roll ups.real-food-snacks-fruit-leathers
I make homemade yogurt.
I use raw local honey for allergies.
I mix raw honey with lemon juice and cinnamon for a homemade cough syrup.
If I'm in pain, I take turmeric.
If I need energy I grab a spoonful of coconut oil.
I take ACV for heartburn.
I use vinegar and baking soda to unclog drains.
When I run out of garlic powder or onion flakes, I dehydrate more.seasonings-dehydrated-vegies


And the list goes on...
In trying times, the list expanded and was confirmed and reaffirmed and necessary. My point is, I proved to myself to be true to what I have written. I proved to myself to be true, and do practice what I preach (so to speak). That acceptance for myself, of myself ,was more valuable than any resolution I could make this New Years.
 I am what I am. Crunchy, and Hippy and still learning -all rolled into one. With this admission, I am happy to roll onto a New Year with freedom to move forward, Happy to be who I am. :)
Thank you so much.
Happy New Years! - Janey


Monday, November 17, 2014

DIY Cookie Butter

Simple to make, and soooo very good. It's sinful, and delicious!!

DIY Cookie Butter


1 c crushed cookies
1/2 c powdered sugar
1/4 c water
1/4 c olive oil

To make, crumble cookies into food processor and pulse until fine powder. Then add oil and water and process for a minute. Slowly add powdered sugar  and let process until thick and creamy.  Scoop into jar or bowl with a good lid. Use on toast, crackers, waffles, pancakes, or as frosting /glaze on cake, or whatever! Warm in the microwave for 30 seconds and drizzle as topping over ice cream.

Refrigerate. Lasts a week.

My advice is to use hard cookies, like chocolate chip or snicker doodles. Cream filled cookies tend to separate. The absolute best is to use homemade cookies, that way you are certain of no extra ingredients you don't want. The oil you use can also vary- I suggest coconut oil or olive oil.
However you put this together, it is definitely cheaper to make at home, (Total price for what I made was about $0.80) and quick to make too! 
Your kids will love the alternate, and you will love both the price and ease.


Saturday, December 7, 2013

Chili Dogs- No Bean Chili

Homemade Chili Dogs- No Bean Chili 


Start with:
1 lb ground beef - lean
1/2 lb ground pork - lean (not sausage)
fry completely, drain of grease, and mince as small as possible-
I have even put mine through the food processor.

 in a separate bowl whisk until smooth and dissolved:
6 cups warm water
1/4 c cornstarch
1/2 c flour

add to water mixture and whisk until smooth:
2 tbsp tomato paste
1 tbsp white vinegar
3 tbsp chili powder
1/2 tsp real salt
1 tsp ground cumin
1/4 tsp black pepper
1/2 tsp garlic powder
2 tbsp dried onion flakes

Add this mixture to the meat and  mix together.  Over med heat - bring to a boil stirring constantly so it does not burn. Once it comes to a boil reduce to smallest simmer setting and cover with lid. Simmer 1 hour, stirring occasionally.

Serve with hotdogs, or over french fries, or even over nachos and extra grated  cheddar cheese. Delicious!!!!!!
Yummmmmm!!!!!!!!!


You might like the links shared at:
Frugal Days Sustainable Ways #100

Mondays Homestead Barn Hop #140


You might like to try:


Disclaimer: Affiliate Links in no way affect your end price, there is no increase for you. But, they do help to support the cost of the blog. Thank you.

Friday, December 6, 2013

My DIY Favorite! My Mix Laundry Soap

DIY Favorite! My Mix Laundry Soap!


We all have our favorites- the ONE recipe or household tip that started the ball rolling for DIY enthusiasts!

This laundry mix was mine- the starter of it all!

 I always had trouble with Laundry soaps. Tide is a hives producer, for me, personally. I always fought the laundry soap blues between budget and quality constraints. When my youngest started getting the itchies from other brand soaps I used, my options kept getting narrowed down. When the options I did have just didn't clean, or seemed watered down, or left bad smells (like some hypo allergenic unscented soaps can)...

...well,  I got fed up! Grrrrrr!

And the search was on.  Thus began my love for DIY!

And oh how my budget can love some of my discoveries.
Hence,  My project for the day!  My Mix!!!!!!! Yay!!!!! 
I'm always Always happy with the results of this one- it has never let me down! I absolutely love it!

I wrote about it before- at this link: My Mix Laundry Soap
So I won't be explaining everything over again, however- I'll give you the recipe once more- :DYay!


My Mix Laundry Soap

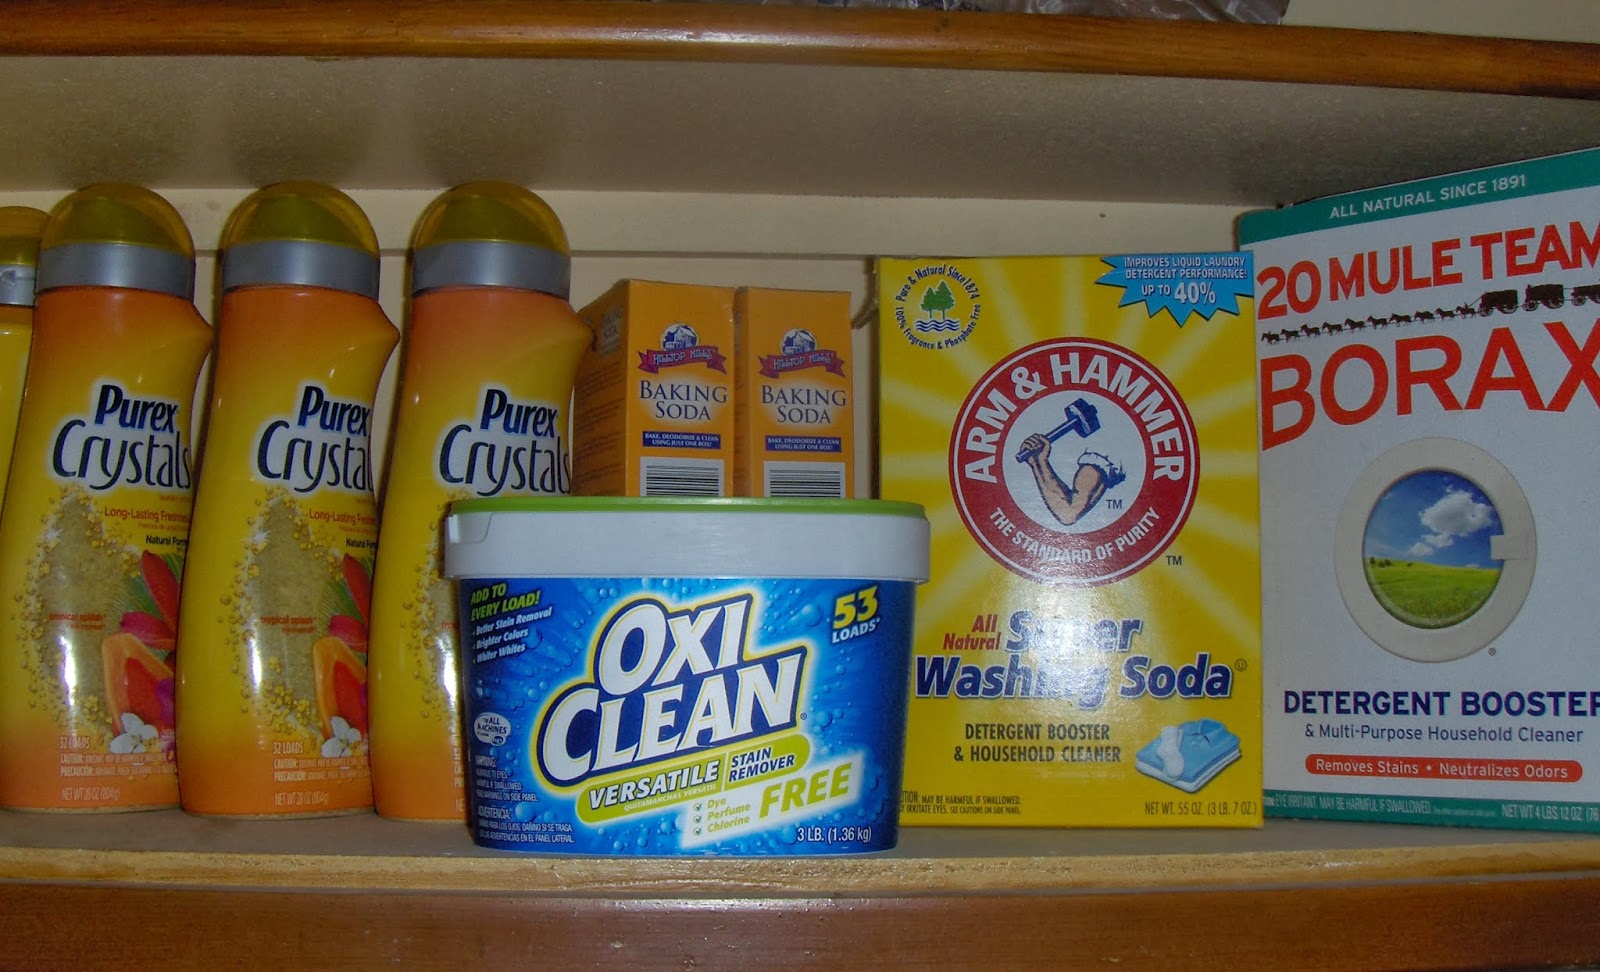
1 box 20 Mule Team Borax (4lb+)
1 box Arm & Hammer Super Washing Soda (3lb+)
4 boxes Baking soda (1lb ea)
3 bars Zote soap (grated ahead of time)(14 0z ea)
3 Purex Crystals Laundry Enhancer (28 oz ea., or 2 -55 oz)
1 OxyClean  (3lb.)

step 1: grate the soap - like this:
(Note: A fine grate is best if you only use cold water. The Zote soap dissolves easily enough.)

Step 2: Mix it all into a large bucket! I use a recycled 5 gal. bucket from my hubby's pile in the garage. LOL  - I pour ingredient's into the bucket in layers or parts outside- because - well the powder can Poof! LOL and frankly I do not want Poof! in the house! ;) , Mix it all - well-  with large ladle or slotted spoon and then--- done! Yay!!!!!!!  It's as easy as that!

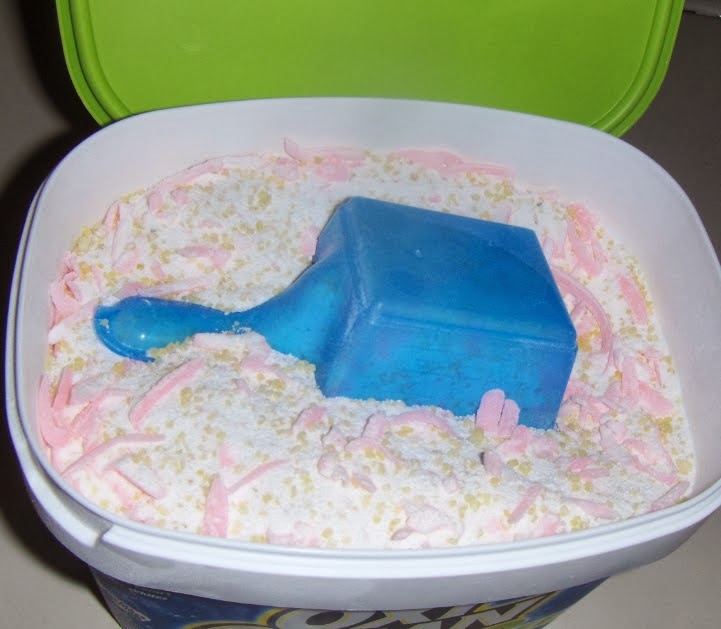
Step 3: Use it!   I recycle the OxyClean container and the scoop that comes with it. Fill it with my mixture and this sits on my washer for daily use. A large load to the 2 line on the OxyClean blue scoop is perfect!

Note: The remainder of the mix, I store in the garage (keep in a cool dry place, away from the children and label) , refilling as needed.

Also to note: because this is a low suds recipe- it is safe for HE washers, and does not leave a residue like some castile soap mixes can.
It lasts! About 6 months- or longer depending how often you do laundry. The cost is a whopping $35.  ---- (compared to the amount I paid before- averaging $20 a month, or more, on soaps- that's a previous cost of  $120 for 6 months of soaps- and I just paid less than $35 actually because I caught everything on sale. Savings $85. For me, this is a no brainer!)

Easy! Done! Enjoy!


You might Like the Links at:
Make Your Own Monday Link Up 12/16


If you can't find items at your local store- You might try:


Disclaimer: Affiliate Links in no way affect your end price, there is NO increase for you. But, they do help to support the cost of the blog. Thank you.

Thursday, December 5, 2013

Good Smells for the Home - Quick and Easy

Good Smells for the Home - Quick and Easy

Today I checked the orange tree in our backyard; pulled the most ripe citrus I could find. Better now than tomorrow, I figured. Because our local weather is predicting a Hard Frost warning tonight, 31 degrees F.
Snow is coming Friday and Saturday.
On my orange tree, I fear some of the top fruit I didn't get today could be bit; but there wasn't much time.
I might have to brave the ladder tomorrow and see what I can salvage.

Today, however, I was after the ripest sweet treats! Oranges are fantastic fruit for the cold weather- to ward off sniffles -and one of the best grab and go treats I can offer the family! 


Bringing in the oranges today sparked an old favorite whim- the smell of fresh orange and cinnamon! But I personally do not do well with commercial potpourri that is soaked in chemicals and heavy on perfumes. I prefer to go natural, and it is so easy to do! Also a huge money saver! Frugal Home Recipe ! Makes the whole house smell great!

Stovetop Potpourri
On the back of the stove, I cut up 2 oranges, and added water to fill the pan and 2+ cinnamon sticks- and set it to simmer. You can use ground cinnamon as well! The wonderful smell soon came from the kitchen! Inspiring! Inviting!  Wonderful! Yay! A Fall favorite anyone can do!
 It Took less than 2 minutes and I had simmering potpourri for the rest of the day! So easy!  Made the house smell fantastic! Loved it!
(Note: simmer the potpourri mixture, and check the water off and on all day, It will run out! Don't forget to check. Simply add more water if you need. Be sure to turn off if you leave, or head to bed!)

It can be done with any citrus! Oranges, Lemons, Limes!  And different spices! Anise, nutmeg, ginger, cloves, cinnamon! or Mint! Whatever combo strikes the inspiration in you! Even just the smell of simmering cinnamon can be a welcoming change! Try apples! Ahhhhh! Fantastic! Aromatic and romantic! and best yet- all natural.

Hope you might try it! But be careful! You might end up absolutely LOVING it!.


You might like the tips shared at:
Frugal Days Sustainable Ways #100


You might like these items:


( Disclaimer, the links above are affiliate links. Affiliate Links in no way affect your end price, there is no increase for you. But, they do help to support the cost of the blog. Thank you.)

Wednesday, November 27, 2013

Janey's Pumpkin Pie

Janey's Pumpkin Pie 


Pie Crust:

2 c flour
1 tsp fine real salt or sea salt
2/3 c real butter, or coconut oil (Note for taller, flakier crust use Lard)
1/3 c cold water
Pulse butter (cut into cubes) and salt and flour in food processor until crumbly.


Add water and pulse until ball forms.Or in a bowl, add cut butter and flour and salt, and use pastry cutter to mix- mixing until crumbles begin and then add water to ball.

Lay out on a flat surface, cut ball in half (makes 2 crusts) roll out flat to fit 9" pie plate, pinch edges of crust. let rest 15 min before baking.

Filling:

1 can Pumpkin Puree (15 oz)
1 can Coconut milk (13.5 oz)
2 egg yolks
1 egg
3 tbsp honey (or sugar)(Note: for sweeter pie increase to 1/4 c, I prefer to taste stronger pumpkin.)
4 tsp pumpkin pie spice (or 2 tsp cinnamon, 1 tsp. ground ginger, 1 tsp nutmeg)
1/2 tsp fine sea salt (or real salt)

Preheat oven to 425 degrees F.
Blend with whisk pumpkin puree and eggs until smooth. Add spices, salt and honey and the coconut milk. Whisk together until creamy smooth.


Pour into pie crust filled pan (9"). Tap to release air bubbles. (Foil around the edges if you do not want dark brown - I forgot this! But I'm reminding you! ;P!  )
Bake 15 minutes. @ 425 F. Then Turn down oven to 350 degrees F and bake remaining time until set- about 40 min. Butter knife inserted toward crust edge should come out clean.

Let cool completely. Serve with Whipped cream and enjoy! 


You might like:


( Disclaimer, the links above are affiliate links. Affiliate Links in no way affect your end price, there is no increase for you. But, they do help to support the cost of the blog. Thank you.)

Friday, November 22, 2013

Finishing touches

Simple curtains and Fun- Finishing Touches.


Moving and unpacking for an unorganized person like myself takes time. Finding the right spots for things- adjusting, readjusting... the shelves that were in one house, are not the shelves in the new house... more in the bathroom- less in the bedroom- where is this? where is that? -

Moving takes time. Simple as that.
And then, there are the final touches. Small things that make a house a home.

I never had sliding glass door in the old place- now I have 2. Oh what to do- what to do?...
So I made curtains for the one in my dining room, and although it has been over 16 years since I sewed- it slowly came back to me. Simple straight stitches- trimming,leaving room for the curtain rod, length. I had fun. Nothing complicated.
I liked the end result- I was happy with the light weight material letting in more light to my dining room.

I still haven't decided what to do on the slider in the bedroom! But that's coming. I'm thinking dark beige there. We shall see. 

Then I was loving the light in the kitchen! 
The window above my sink is my favorite, and although I like my privacy I do not want a solid curtain there. So I thought this was a perfect time to have some fun! I have never done it before- I decided to string my own beads - used all kinds- from natural stone beads to plastic pony beads. I found a few decorations in the Christmas isle that worked too - haha!  I wanted a prism for the light to catch and rainbow all over- mainly for my cats; who cannot get enough of little lights, refractions, and laser light dots- lol.
But a bead curtain???! How retro- so retro, I was in love with the idea- just for fun! Because the kitchen to me is a fun place, and the center for the home! So here's my start- I have to go get more beads to start - but you get the idea. Enough to give the cats a small rainbow refraction- and enough to make me smile! yay!
I plan to make a small top valance to hide the wire tops, but that's it for this window. I'll add beads as I can.

What's most important to me is to make our place feel comfortable. It's not the things we have, or do not have, that make it special - it's the thought, care and love in a home that makes it bright and loving.
Time- everything takes time. 
It is slowly coming together. yay!!!!!!!!!!!! :)

Happy hearts make a happy home.
Brightest Blessings!


You might enjoy: 


Disclaimer: Affiliate Links in no way affect your end price, there is no increase for you. But, they do help to support the cost of the blog. Thank you.

Sunday, November 10, 2013

Oh, How I love DIY All-Purpose Lemon Cleaner!

 DIY All Purpose Cleaner

After a lapse in my routine, and exposure to commercial cleaners for 3 months, I am falling in love with natural cleaners all over again!  Oh, how I missed the sweet fresh smells- the aroma of essential oils- and the nontoxic clean!!!!!!! It just does not compare- really!  

Today was a shining example-  the task of cleaning the stove top and mainly the oven. I hate cleaning an oven- sorry no excuses - just stating a fact- I hate cleaning ovens. Awkward and the worst tough grease ever. People I know scream, "Easy Off!"  I respond with a resounding, "Noooooooo!"
 A former employer of mine would spray it without care- noxious fumes a flying! It was horrible- I won't go that route. Ever.

I made a batch of fresh DIY All Purpose Cleanser, and while the formula was still hot in temp I turned right around and sprayed down my oven! The worst thing that happened in my house is my husband asking-"Did you peel an orange?" (I'd added orange essential oil to this particular mix as well as lemon essential oil.) The result? My oven is shining! and I finished with ease in less than a half hour- that's with complete wipedown inside and out.
The best part- I saved a small fortune making a very effective cleanser, using basic safe ingredients already in the house.  I do not have a headache from fumes, my family isn't running from the house because of the horrible cleaners smell,  no one was exposed unnecessarily to toxic ingredients, and it's clean! So clean I want to bake! I am heading for the store now- Haha!  

All Purpose DIY Lemon Cleaner 

1 tsp washing soda
2 tsp Borax
1/2 tsp liquid soap (Castile soap or dish soap)
2 c hot water
10-20 drops lemon essential oil
pour into recycled spray bottle, cap and shake until dissolved. spray on surface and wipe away!* Works wonders on stoves, and counter tops!


Knowing I was cleaning the oven I added about 5 drops orange essential oil- just because it smelled so good. I was wanting the citrus smell! LOL

I have posted this mix before- I am just resinging the praises due to our personal lapse. You can find my original post at this recipe here: DIY All Purpose Cleaner


You might like to try:


Disclaimer: Affiliate Links in no way affect your end price, there is no increase for you. But, they do help to support the cost of the blog. Thank you.

Friday, August 2, 2013

DIY Homemade Body Wash

DIY Homemade Body Wash


I am still using castile bar soap in the shower, but occasionally- especially during extra hot summer days-  I love to use body wash- and my favorite is peppermint body wash during the heat.

 In a recycled, or new squeeze bottle add:

2/3 cup Castile Soap (Dr. Bronner's Peppermint is my favorite in the summer for cooling relief;  Lavender is fantastic at night ; and Citrus is refreshing and great for energy and early mornings! But, any will work!)
1/3 cup Coconut milk (hydrating for skin)
2 tsp. glycerine
2 tsp. vitamin E oil (an antioxident that actually helps preserve the mixture)
additional Essential Oil for more scent, if desired. (5-10 drops of whatever you like- whatever compliments the mood!)

Shake well to mix.


Wet a washcloth, or loufa and squeeze a bit on- lather and enjoy!

Rinses off with ease, doesn't dry your skin out or leave you with icky film, is refreshing and wonderful and all natural!!!


Best Homemade Body Wash I have found yet!

Great for kids!  Perfect, if you choose Baby Mild Castile Soap for youngest ones! (Reduce amount of essential oils added extra for babies - you don't want to irritate their sensitive skin!)
All Natural and safe from toxins, and perfumes! Yay!

Note: Unless you know you will be using a lot, make small amounts at a time, store in cool place, will last a week or two.

I hope you enjoy!


You might also enjoy the links found in:

Make Your Own Monday 8/5

Homestead Barn Hop 122


You might find items here:


Disclaimer: Affiliate Links in no way affect your end price, there is no increase for you. But, they do help to support the cost of the blog. Thank you.

Monday, July 1, 2013

DIY Greasy Hand Cleanser

 DIY Greasy Hand Cleanser


Have a man in the house always working on something? Mine is...
He was a Diesel Mechanic for Railway for many years. I learned over that time there is nothing to use against Cosmoline (a railroad mama's nightmare!) However, the regular grime and grease out that can happen with cars and small engine's is another story. And yes,  I have an answer for those greasy grimey hands that can often need extra strong cleaning.

DIY Greasy Hand Cleanser

1/4 c salt
1/4 c baking soda
1/4 c sugar
3/4 c Dawn dish soap-The blue stuff - (+-)
10 drops Tea tree essential oil (for anti bacterial properties) Lemon works well too! Or both. 
1 tbsp bentonite clay (optional -if you really need extra power)

In a tub that's reusable, but not breakable- (I used a rubbermaid tub that holds at least 2 c liquid) 
sift together the dry ingredients until thoroughly mixed. Add dawn dish soap and mix until thoroughly incorporated. If too paste- like, you can add more dawn until it comes out creamier, but not too liquid. You want the scrub capabilities!
Have that guy scrub, and rinse with warm water.

Works well as gardener's mix too. Especially after a long day in the dirt! :)Yay!

Better smelling than the orange gunk they usually use in the shop- but very effective. Better for them too, but you don't have to tell them that.   ;)


Shared with, and you might like the links at:
Monday's Homestead Barn Hop #117

Frugal Days Sustainable Ways #79


You can try:


Disclaimer: Affiliate Links in no way affect your end price, there is no increase for you. But, they do help to support the cost of the blog. Thank you.

Thursday, June 20, 2013

100% Natural Detangler

Natural Detangler -


Surprises can come from the simplist of things. And I love the fact I learned this one! YAY!!!!

The longer my hair gets the more I have to mind the tangles. I have naturally curly hair that can frizz and tangle in a heartbeat (or a foggy day- whichever comes first! Haha!)  I am sooo tired of the myriad of products all designed to detangle, with nothing more than fake, toxic chemicals that strip and dry out; or do the opposite- coat and grease, and weigh down the hair. Either way- when I discovered this simple secret- I have never been happier.

Aloe. 100% pure, all natural aloe.
I use Aloe Vera gel! All natural 100% Aloe Vera Gel  (about a quarter sized portion in my hand)  run through the ends of my hair softens, detangles, and moisturizes my hair- without residue, without chemicals. Applied to my wet hair (or to dry), it works wonders and has no scent, it soaks in, is weightless and non greasy, and combs through and dries clear- disappearing.


I now use it after every shower. I combine the quarter sized dollop with 1-2 drops of lavender essential oil and my hair smells amazing, and I have no fear of the comb! Plus! It reduces the amount of frizz my curls have- for my hair it's amazing!


This is exceptionally natural way to detangle a child's hair with less tears and no extra toxins or build up. Less tears-that is a huge WIN WIN! & makes mom happy!  It's fantatsic for the scalp and skin, and cannot harm children in any way!
 

Oh how I love Aloe Vera and it's many uses! Always work from the bottom up. If the tangle mass is huge- douse the mass with aloe and slowly separate- within minutes it starts to come apart and combs right through!

After a long conversation with my friends Virginia, and Vicki;  I was happy to have it confirmed that Aloe Vera works in more hair types than just thick curly brown! Which is fantastic news! Virginia and Vicki both have confirmed that Aloe Vera is excellent in ethnic hair! Vicki said she uses aloe all the time on her and her daughter's hair, when she gets her out of bath she puts it on,  and said she likes it because it does not add extra weight and is non greasy!!!! Followed by coconut oil for extra moisturizing, especially when using the hot irons-  they are 100% natural and happy with their hair!  Yay!!


Healthy Hair! Happy Hair!


Shared with and You might also like the links at:

Frugal Days Sustainable Ways #77

Make Your Own Monday Link Up 6/24

Homesteaders Hop 23


You can find items here:


Disclaimer: Affiliate Links in no way affect your end price, there is no increase for you. But, they do help to support the cost of the blog. Thank you.

Friday, June 14, 2013

DIY Glass Cleaner

DIY Glass Cleaner   

The blue stuff.... ugh....
millions of gallons of the blue stuff are sold daily- all just because the mass market media says it's what you should use to clean your windows. But.... do you HAVE to use the blue stuff?
NO.
Did you know the blue stuff contains: Ammonia, 2 Hexoxyethanol, Ammonium Hydroxide, Mirapol Surf S-210, Viden EGM, Sodium C14-17 Sec-Alkyl Sulfonat, and Synthetic Fragrances.

Not green. Not safe. More like a toxic concoction of mess.
Don't know what some of these are? Neither does your body, or the earth, or your pets, or your family. Like I have explained before in posts- if an ingredient listed on an item is non-pronounceable, non-recognizable to you- it most likely is non recognizable to your body! Toxic chemicals, when sprayed, go into the air you breathe, and soak into your skin on your hands that you touch. They are either inhaled or soaked in, and are dangerous either way to your health. They leave a toxic chem-trail behind that can affect you.

Many things clean glass.
Many things clean glass well: and are safe, effective, non-toxic, and GREEN.

Like what might you ask?  I'll address the 2 most common, that you most likely already have on your shelves: Hydrogen peroxide, and or - Vinegar.

Hydrogen Peroxide -


Did you know the nozzle to a standard spray mist bottle will fit directly onto a peroxide bottle? So perfectly convenient-  no mess no fuss?

Hydrogen peroxide as a glass cleaner?
Oh yes! And much more!
Hydrogen peroxide is cheap! And not only does it save money, it is Antibacterial, Antifungal, Kills mold, Kills mildew. It is a natural  disinfectant!!!!! Kills house hold germs and prevents spreading of germs due to common colds and flu!  My first grab if someone has been sick.

You can clean far more than your windows with it!
You can clean glass, counter tops, sinks, and other hard surfaces. Use the three percent solution undiluted in a spray bottle and spray it on the surface to be cleaned. Allow it to stand for several minutes and then wipe it off.
Hard surfaces that can be cleaned with hydrogen peroxide are: counter tops, stove tops, appliances, mirrors, windows, showers, shower doors. bathtubs, sinks, toilets, garbage cans, walls, door frames, door knobs, etc etc.

My favorite use for a bottle of peroxide is in the kitchen. It is the perfect disinfectant for my cutting boards! Wash the cutting board off in the sink. Then Spray on Hydrogen Peroxide, wait 10 minutes, and wipe away. This eliminates all bacteria from meats & raw foods and disinfects your cutting board! No cross contamination! Yay!

Vinegar

White Vinegar is incredible.
For DIY Glass Cleaner:  A 50/50 solution of water and vinegar in a spray bottle is all you need for glass cleaning! Spray on, wipe dry. It works! No streaks! Removes dirt, finger prints, and other grime that can build up. All natural, no toxins.
If gunk is built up on the glass surface you can apply vinegar undiluted and remove nearly anything. (An example for me was the bird poop that was graciously left on my car window the other day- by the time I got to it, it was dry and permanently stuck on....ugh...until that is I applied the vinegar! Yay! Gone in seconds!)

Vinegar is the best household cleaner! It cleans, disinfects, is anti fungal, antibacterial, eliminates mold and mildew, kills most household germs, and it's cheap! Making it extremely frugal for house cleaning!

Make Homemade Wipes with vinegar- these will clean your glass, windows, tubs tiles, counter tops, stove tops sinks, walls, doors. door knobs, shower- (oh! in the shower! get rid of mold and mildew with vinegar too!)


You can mop with vinegar solution as well! Shine those tile or linoleum floors! Safe and effective!


Here is my mirror after vinegar- see no streaks! Just clean clear shine. Yay!


Between these 2 cleaners- you can nearly clean your entire house! Frugal, and very GREEN cleaning!


Shared with, and you may also like the DIY Links on:

Make Your Own Monday Link Up

Homestead Barn Hop #115

Frugal Days Sustainable Ways #77


You might like to try:


Disclaimer: Affiliate Links in no way affect your end price, there is no increase for you. But, they do help to support the cost of the blog. Thank you.

Thursday, June 13, 2013

Homemade Biscuits

Homemade Biscuits


4 tbsp cold real butter or cold lard
1 tsp sugar or honey
2 c whole wheat flour
4 tsp baking powder
1 tsp real salt
3/4 cup whole milk, or half and half

 Preheat oven to 425F.
Cut butter into slices and in bowl,  sift together the baking powder and wheat flour and sugar and salt. Using a pastry cutter, or fork, combine until mixture is small crumbs. Add milk all at once and stir until batter follows fork, place on lightly floured surface and barely knead with hands a few times (comes together fast and do not over work).
Roll out dough to about 1/2 inch thickness. Cut out biscuits using a cookie cutter, biscuit cutter, or I used a juice glass with edge lightly floured :). Place biscuits on an un-greased cookie sheet.
Bake for approximately 10 minutes, or until light brown on top. Do not over bake - or the bottoms will burn.

Awesome, flaky, and easy alternate to pre-made biscuits; making this a healthier Real Food alternate to the convenience prepackaged foods containing unnecessary preservatives and fake ingredients.


Note: This is an excellent recipe for teaching the kids dough, measuring and mixing, following instructions, and baking. Fun for all! Make memories in the kitchen!
Kid Idea: Make small amount of  bacon and scrambled eggs, and grated cheese; allowing the kids to stack their own breakfast sandwiches. :)

Tuesday, June 11, 2013

Brilliant!!!! DIY Natural Homemade Wipes

DIY Natural- Homemade Wipes

I do not jump...
Simply put.
"Jump!" is not in my vocabulary. Seriously...whew-  It takes a whole lot to make me jump! And I rarely find anything on the internet while doing my research that makes me jump.

BUT!!!!!
Leave it to my cyber green mentors at DIY Natural .com - Matt and Betsy Jabs- to get me off my bum and actually JUMP!
And I did... I was so excited!  (I'm becoming such a crunchy geek-haha!)
!jump! Yay!
 I jumped up, left the computer on the blog page, and grabbed what I needed and made it -without thinking twice!

Homemade Wipes! Disinfecting wipes to clean everything! To replace disposable cleaning wipes- to replace costly, constantly needed disposable cleaning wipes with green reusable, disinfecting all natural wipes!!!!

Why didn't I think of that!? Oh, I wish I had thought of that! Oh, wow!!!!! Amazing!!!!!!!Yay!!!!

 DIY Natural just posted an answer- completely green, reusable, and awesome!!!!!!


Get excited, jump up, and go over to their site and read how to make your own!

It works! And the whole kitchen smells clean! ( I'm going to make another for the bathroom! Perfect for wiping down the tile, the sink! the shelves! Yay!!) I just tossed the rags in the laundry when I was done! So easy!
If  I am writing a review; I'd have to honestly say- this should be every person's first step in green cleaning!

So easy! A+ idea! A+ blog post!  Go!

Go now! and celebrate!
http://www.diynatural.com/homemade-wipes/


Thank You so much, Betsy Jabs!!!!! You rock!